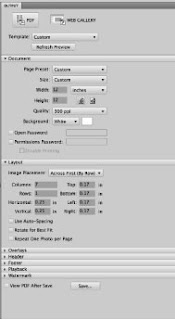
Open Bridge and select photos for your grid. Click the Output workspace, found on the upper right next to Essentials, Filmstrip, and Metadata.

On the Output Palette (right side of your workspace) make your document selections; size, resolution and layout. In my case I chose 12 x 12 inches so that my pictures would fit a standard scrapbook layout, 300 ppi to match my layout resolution, and seven columns (this number will match the number of photos chosen, or if you want multiples of one picture, how many images you need across your paper) and one row (my choice makes a filmstrip type layout, you may want more rows to achieve the type grid you desire).

Click PDF at the top of the Output Palette then click the save button at the bottom, choose a location where it is easy to find. You will receive a message when the process is done. Now Open this file in Photoshop. You will get an import dialogue box, leave all settings as they are and click OK.
Notice that you now have perfectly sized photos on a transparent background ready to add to your scrapbook page.

Hope you have fun working on your Grid Layouts!
(as the photo's are hard to see, if you would like a PDF copy, please post a comment with an email address and I will send it to you. Thanks)
No comments:
Post a Comment